
Click here to view IO3 STEP1 Course Students Initial training module
Meeting minutes from Piatra Neamt .

Project 2021-1-RO01-KA220-VET-000032924 DIGIT+Digitalization for in groups integrative training – international network for support, connection ,innovation and know-how share in digital vocational education
Second project international meeting Piatra Neamt 15-18 January 2023
Meeting Minutes
Monday 16 January
All partners meet in the meeting room of Colegiul Tehnic Ghoerghe Cartianu Piatra Neamț.
1000
Welcome introduction was made by Mrs Livia Marinela Nicolae all partners introduced themselves and meeting objectives been presented by Mrs Eleonora Dragomir ASCETIS president and project coordinator at European level. From Colegiul Tehnic Gheorghe Cartianu been present to the meeting 7 teachers that been tested project platform and used in their lessons digital learning instruments for integrative groups of students.
10.30
The meeting was continued with a debate on multiuser virtual worlds.A practical example of a Canva lesson type CLIL for English and Geography created as a multiuser virtual world with theory, exercises, images ,MP3 and MP4 files included.The possibilities of integration and development of the disadvantaged students skills trough this instrument been analyzed. The participants proposed to be created other lesson examples of MULTIUSER VIRTUAL WORLDS in HTML, Microsoft office 365 –Powerpoint and in social platforms like Facebook , Google blogs and to be offered as ready made examples in the project IO2 the guide for teachers .
11.00
For the section dedicated to students with 7 technical modules from different technical domains SABA Macedonia presented the module AUTOCAD for furniture design and the way this module was learned by am integrative group of students in their school.
M&M Profuture Training presented the module Customer Relations Management , ASCETIS presented the module for WEB illustration with Adobe Flash +I-frame , CT Gh.Cartianu presented the robotics module and a robotics demonstration was made by the students engaged to this course, from ATATURK MTAL the course of 3D printing was also presented with the virtual laboratory and students projects, KOGED presented The Module for digital initiation of disadvantaged students IO3, Hello PC presented the networking platform and from EPRALIMA a set of ready made digital instruments for distance learning was also presented .
M&M Profuture Training presented also the Module for Advanced digital training of students IO4 .
How to create specialized discussion groups to engage students in collaborative learning and enhance their motivation the case study of the integrative group for robotics created by Mrs Gabriela Horlescu was debated in the Robotics Workshop of Colegiul Tehnic ”Gheorghe Cartianu”.
In the end of the day been presented the articles for the Didactic part in IO2 , the guide discussions on articles about digital didactics been made and was established the final form of the guide to be in HTML in order to be possible automatic translation.
Eesti People to People presented the Guide for Burnout Management, IO6 .
15 The next project events schedule was established : Barcelona TPM 5, 6 June 2023 , Izmir TPM 30 Seotember 1 October 2023. Establishing the to do list for next 3 monts of the project we decided to create more local and international dissemination events for the 7 intellectual outputs of the project and to evaluate by the indicators the project results.
Tuesday 17 January
We meet with all partners in the conference room of the associated partner Liceul Economic Tehnologic Administrativ Piatra Neamt , the associated partners Liceul Tehnologic Dimitrie Leonida , Colegiul Forestier , School Daniela Cuciuc , General School no 4 , Colegiul Tehnic de Transporturi Auto , Colegiul National de Informatica Scoala Profesionala Speciala Stefan cel Mare participated with students and or teachers . In total our conference reunited 250 participants .
Reporters from Apostolul Magazine Ziar Piatra Neamt and Anotimpuri Magazine together with local stakeholders from enterprises with the digitalization work domain been also invited .The multi-stakeholder dialogue workshop was conducted by the coordinators from each partner organization .Conclusions were that the project Intellectual outputs are very necessary and should be facilitated access to project platform in each school .
We left the conference with promotion materials and we conducted a project caravan to rural schools from Neamt county and we managed to reach many other teachers interested to enter project platform and benefit of digital means for inclusive education.
In the afternoon we participated to a popular dances and winter rituals representation sustained by the Popular Dances Formation Toporasul of Technical College Gheorghe Cartianu .
Exchange of experience was made also by analising the arts role in schools and the possibilities of burnout management and marginalization prevention trough practicing arts in extracurricular activities . Methods from project Arts Against Addictions code 2021-2-RO01-KA210-ADU-000051453 were presented by ASCETIS and methods from project MUSIC AND DRAMA ONLINE AND TOGETHER project code 2020-1-DE02-KA227-ADU-008174 were presented by ”Ataturk” MTAL .
Participation certificates been awarded to all participants in Colegiul Cartianu conference room .
Minutes of meeting in Portugal
DATEBASES
Definition of databases
A database is an organised collection of information or structured data stored electronically on a computer. A database is usually controlled by a database management system (DBSM). Taken together, the data, DBMS and associated applications constitute a database system, abbreviated to database.
A properly designed database provides access to up-to-date and accurate information. Because proper design is essential to achieving your goals in working with a database, investing the time to learn the principles of good design makes sense. In the end, you’re more likely to end up with a database that meets your needs and can easily accommodate change.
Since their advent in the early 1960s, databases have evolved significantly. Navigational databases, such as hierarchical databases (which were based on a tree model and allowed only hierarchical interactions) and networked databases (a more flexible model allowing more complex interactions), were the initial systems for storing and managing data. Although simple, these systems were not flexible. In the 1980s, relational databases became popular, followed by object-oriented databases in the 1990s. Subsequently, as a result of the development of the internet and the need for faster processing of unstructured data, databases have evolved, with some now also operating online.
Examples of databases
– Databases for a class
– Databases for a school unit
– Database for a library
– Online school catalogue database : https://www.adservio.ro/
– Database for the subscribers of a mobile phone company
– Database for online accommodation reservation : https://www.booking.com
– Database for an online sales site
Types of activities involving the need to organise data in databases
Databases are used in all types of activities: activities of public and private institutions.
Applications
1Search for information about activities of public and private institutions where databases are used.
2.Search for information about SIIIR – Sistema Informatic Integrat al Înducaântului din România (Integrated Education Information System in Romania).
Database management systems
Database management systems (abbreviated to DBMS) are all the programs used to create, query and maintain a database.
The DBMS must ensure the transition from one level of abstraction to another, i.e. be able to interpret ‘commands’ expressed in terms of an external schema in order to translate them via the conceptual schema into input-output operations at the physical level. The DBMS manages at the conceptual level a data dictionary. The database management program modules perform physical access to the data according to the requirements expressed by a ‘command’. The data definition program modules allow the translation of a specialised language that describes the nature of the data and the logical relationship between the data at the global level according to the conceptual schema as well as the external schemas specific to each external program application. The data manipulation program modules allow users to find, insert, modify and delete data in the database using a specialised language. Data control and security program modules are designed to ensure data confidentiality and integrity, and to address concurrency issues. Utility program modules allow for the correct and easy maintenance, manipulation and operation of the database.
DBMS systems are continually evolving and need to expand in order to effectively address new user requirements.
Examples of database management systems
Microsoft Access – part of the Microsoft Office suite
FoxPro – The FoxPro programming language was invented in the mid-1980s. Created for computers using the MS-DOS operating system, it was then the language that offered the fastest access to data. In 1992, the company that owned the product, Fox Software, was bought by Microsoft.
ORACLE – Oracle is one of the world’s most popular DBMSs and is considered a professional DBMS. The system was developed by the Oracle Corporation in the USA.
Connecting to an online database

Creating a new web database
– Under available templates, click on the blank web database.
– On the right-hand side, under the blank Web database, type a name for the database file in the File name box or use the one provided for you.
– Click Create.
Access provides a number of templates with the product, and more can be downloaded from Office.com. An Access template is a pre-designed database, complete with professionally designed tables, forms, and reports. Templates give you an important start when creating a new database.
Opening an existing database
FileOpen MenuSelect the database you want to open Open
Modifying the database
Once a database has been created, it can be modified by creating new objects: tables, queries, reports, etc. Database modification operations can also be performed using the options in the Edit menu: Copy, Cut, Delete, Rename which apply to the objects contained in the database.
Saving and closing an existing database
When a new database is created, a window like the one below opens, asking you to enter the name of the database (File name section) and choose the location where the database will be saved (Save in section). The creation and, by default, the saving of the database will be done after pressing the Create button.
Closing the database
File->Close menu or click on the close window button.
Closing the Access application
File -> Exit
Folosirea funcţiei „Ajutor” (Help)
| Pentru a obține informații despre utilizarea aplicației se poate apela la Help dând clic pe butonul |  |
Proiectarea bazelor de date
Prin proiectarea unei baze de date înţelegem procesul de creare a unui proiect pentru baza de date care să asigure desfăşurarea corectă a activităţilor şi rezolvarea cerinţelor utilizatorului.
Baza de date realizată cu Microsoft Access este un fişier ce are extensia .accdb şi conţine următoarele obiecte: tabele (Tables), interogări (Query), formulare (Forms), rapoarte (Reports) şi macroinstrucţiuni (Macros).
Creea o bază de date cu Microsoft Access:
File->New->se alege din caseta din dreapta ecranului opţiunea Blank database -> se alege locaţia unde se va memora baza de date (în secţiunea Save in)->se tastează numele bazei de date în secţiunea File name a casetei care se deschide->clic pe butonul Create (sau se apasă tasta Enter).
Se deschide baza de date și se afișează un table cu cumele Table1 ce poate fi închis.
În procesul de proiectare a unei baze de date, se proiectează în primul rând tabelele.
Table
1.Creating a new table in an existing database then click Open.
2. In the Open dialog box, select and open the database.
3. On the Create tab, in the Tables group, click Table.
Creating a table based on a table template
To create a Contacts, Activities, Issues, Events or Assets table, it is recommended that you start with the table templates for these topics
Data templates have been designed to be compatible with Windows SharePoint Services 3.0 lists of the same name.
1.Click the Microsoft Office button, then click Open.
2. In the Open dialog box, select and open the database.
3.On the Create tab, in the Tables group, click Table Templates, then select one of the
available templates from the list.
 |
Insert a new table based on the selected table template.
Creating a new table by importing or linking to external data
1. To use an existing database, on the File menu, click Open.
2. In the Open dialog box, select and open the database.
3. To create a new database, on the File menu, click New.
o In the File name text box, type a file name. To change the location, click the folder icon.
o Click Create.
The new database opens, then creates and opens a new table named Table1 in the Datasheet view.
- On the External Data tab, in the Import group, click one of the available data sources.
- Follow the instructions in the dialog boxes.
Creating a table by design mode
Select Table Design ![]() and a window opens as in the figure:
and a window opens as in the figure:

As you can see, this window is divided into two horizontal sections: in the upper part you specify the name of the field (Field name column), the type – which is actually the type of data it will contain (Data Type column) and its description (Description column) – which is optional.
Data types
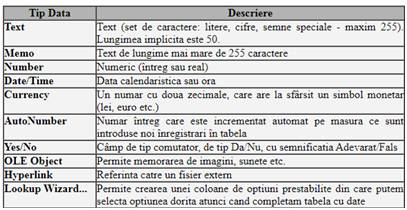
General – for each field created, depending on the data type chosen, displays certain properties of the field:
– Field size – represents the size of the area assigned to the column. By default, 50 characters are allocated for text.
– Format – represents how we can define a template.
– Input mask – entering a template to control how data is entered. For example, entering the symbol 0 or 9 requires entering a digit, L requires entering a letter, etc.
– Decimal places – specify the number of decimal places.
– Default values – the value entered in this section will be the default value of the field before editing.
– Caption – the name under which the column will appear in the forms or reports to be created. Failure to complete this section will cause the column name to be displayed.
– Validation rule – validation rule for the values entered. For example, if the table will contain a Grade field, representing the grade obtained by a student, it must be a value between 1 and 10, which will be written: >=1 and <=10.
– Validation text – this is the text that will be displayed if a value is entered that does not respect the restriction imposed by the validation rule.
– Required – specifies the acceptance or rejection of null values in a column. A null value is a 0 value for a numeric or currency type column, empty string “” for text, date vida #//# for Date/Time type, No for logical type Yes/No.
– Allow zero length – allows or disallows treating a zero length string as a valid value. Setting this property is independent of the Required property.
– Indexed – indicates the presence or absence of an index for the column. On value No(No Duplicates), the allowed values are unique, and on value Yes(Duplicates OK) the column values are not unique.
Example:

Defining the Lookup Type
Microsoft Access offers the possibility to enter data in a field from a list of values from which we choose the desired option. The elements of this list can be entered manually or automatically taken from a table field or a query. To create such a field, in which we will enter the values manually, we perform the following steps:
– select the Lookup Wizard field type;
– from the window that opens select the option “I will type in the values what I want”, then click the Next button;
– set the number of columns (usually only one column), then enter the list options and proceed to the next step (click Next)
;
– confirm the column set as search type and save the column definition (click Finish).
After each field has been defined, save the table and close it. If the save operation has not been performed before closing the table, Microsoft Access will open a box in which we have to confirm whether or not to save the created table.
Aplication
1.Design a database named School.accdb for a school unit containing general information about classes (name, principal, classroom), information about students in each class. Design 2 tables: Classes table, Pupils table2.Design a database named Class.accdb for a class of students.
Design 2 tables as follows: Table Classes
3.Design a database named Catalog.accdb for a class of students allowing the entry of grades for various subjects.
4. Design a database named Library.accdb for the school library.
Entering data in a table
To fill the table with records, double-click on the table name, which is displayed in the window containing the database objects. The records are entered taking into account the data type supported by each field.
Applications
1.Enter data in the database School.accdb for 2 classes of 15 students. tables: table Classes, table Students.
2.Enter data in the database Classroom.accdb for a class of 15 pupils
3.Enter data in the Catalog.accdb database.
4. Enter data in the Library.accdb database.
Database management
Open the table in which you want to perform operations and use the toolbar buttons:
Open the table in which you want to perform operations and use the toolbar buttons: 
Data search ![]()
Data sorting 
Applications
1. Search the database School.accdb for students with the name Popescu.
2. Sort the pupils in the database Class.accdb in alphabetical order.
3. Sort the students in the Class.accdb database by date of birth.
Form
The form is an interface between the user and the table and is used for data entry, but can also act as a menu or overview of information.
Creating simple forms
Select the table for which you want to create a form, choose from the Create tabà Forms à Form ![]() . The form containing all fields of the selected table will be displayed automatically.
. The form containing all fields of the selected table will be displayed automatically.
Creating forms using the Form Wizard (Form Expert)
Select the table for which you want to create a form, choose from the Create tab à grupul Forms à Form Wizard ![]() .
.
Steps to produce a report using Expert Form:
| Step 1 – Select the table or query for which you want to create the form; Step 2 – Select the fields we want to appear in the form; |  |
| Step 3 – Choose the layout of the form; |  |
| Step 4 – Name the form. |  |
Using forms, a user of an MS Access database can simplify the data entry process and reduce data entry errors.
Applications
1. Design a form for the Class.accdb database that allows data entry for students in the class.
2. Design a form for the Catalog.accdb database that allows the entry of grades for a specific subject for students in a class.
Simple queries
Queries are ways of selecting and displaying information from one or more sources (tables or other queries), formulated using logical conditions.
Creating a simple query (Select Query)
To define a selection query we select the Queries option in the Database window, then the Create query in design view button.
As an effect, the adjacent window will appear, from which we select consecutively (in any order) the required tables and for each one we press the Add button. After selecting the tables / queries we press the Close button.

If, once the sources to be queried have been set, we want to go back and change them, the Query menu options are available, but to remove a source we must first select it and then choose Remove:
 |  |
| If the tables have common fields (defined in the process of creating them), Access automatically sets those relationships. Next we indicate, at the bottom of the window, the fields in each table (in the desired order) to be displayed or for which selection and/or sort conditions will be specified. The fields are included by “dragging” them with the mouse from the tables in the top box to the Field row of the bottom box, or by double-clicking on their names. After this, we specify the selection conditions and/or sort order, in this way the query is considered defined. |  |
1. Design the query in Design View mode: select Query from the Database window and choose Design View design mode.
2. Include the table for which the query is executed.
3. Select Delete Query from the Query menu. As a result, the title of the window changes to Delete Query and the Delete line appears at the bottom of the window.
4. From the list of table fields displayed at the top of the window, select the fields that will be displayed in the query or for which selection conditions will be specified and “drag” them into the respective cells of the Field line at the bottom. As a result, for each field, the Where option automatically appears in those cells.
5. Enter in the cells of the Criteria line the conditions of the selection (the conditions that the records to be deleted must meet, next to the corresponding field).
6. To get the list of records to be excluded (but not yet excluded), view the query in Datasheet View mode.
7. If the results are as desired, return to Design View mode to actually remove the records by selecting the Run command from the Query menu. As a result, an information message appears on the screen about the total number of records to be deleted. If we press the Yes button, the targeted records are permanently deleted. To abort, press the No button.
Applications
1. Design a query for the School.accdb database so that students from an
in reverse alphabetical order.
2. Design a query for the School.accdb database so that the following are displayed
information: class name, principal’s name and student names
3. Design a query for the School Catalog.accdb database to display the students who
have scored above 8 in Maths.
Report
To create a new report, you will need to click on the Reports button on the left hand side of the database window and then choose the Create report by using wizard option, after which you will need to go through the necessary steps to create the desired report.
Steps to create a report using the wizard
| Step 1 – Select the table or query for which you want to report; Step 2 – Select the fields we want to appear in the report; |  |
| Step 3 – Choose how to structure the report by grouping the data in the table or query; |  |
| Step 4 – In this step you can determine how to sort the data (ascending or descending); |  |
| Step 5 – At this stage you can choose how the data will be represented in the report and the orientation of the report page (Portrait or Landscape); |  |
| Step 6 – Name the report |  |
Applications
1.Design a report for the School.accdb database so that students from an
in reverse alphabetical order.
2. Design a report for the School.accdb database so that all fields in the Students table are displayed. Set the size to A4 and the orientation to Landscape for the page.
Bibliography:
Pyton – PROGRAMMING LANGUAGE – GENERAL NOTIONS
Overview
G.I. JOE is the name of the most remarkable carrier pigeon and saved 1000 British soldiers in World War II. The little pigeon flew 20 miles, in as many minutes, back to the American base and the attack planes never took off.

British soldiers had already occupied the town of Colvi Vecchia, the Germans had retreated, and an air raid would have been devastating for the alliance. The Mayor of London later presented the Dove with the Dickin Medal for bravery.
Similar to animal training, computers are programmed. G.I. Joe orients himself according to the position of the Sun, the Earth’s magnetic field, or instincts, but the electronic devices are raw computing power that initially knows nothing (hardware).
The microprocessor (Central Processing Unit) is the brain of the computer and operates under the control of machine code instructions, incredible sequences of 0s and 1s that are hard to understand without advanced knowledge.
To use the computer, we use software, i.e. specialised programs that fall into four broad categories: operating systems, applications, compilers and interpreters.
For example, to develop an application we need to know a programming language such as C++, C#, Java, Python.
The programming language contains instructions that follow certain syntax rules and we can program the computer to perform a sequence of operations to obtain a result. Instructions are written in a language that is close to natural language, often English. This produces source code.
Depending on the language used, the source code is transformed into machine code using a compiler or an interpreter.
The compiler scans and analyses all the source code, then turns it all into machine code in the form of an executable program. Although it is faster, program errors are displayed at the end, making debugging slightly more difficult. Examples: C++, C#, Java, etc.
The interpreter transforms the code line by line into machine code, so there is no need for an executable file generated at the end. At the first error the analysis stops, making it easier to debug programs. Examples: Python, Pearl, JavaScript, etc.
As a programmer, you need to have deep analytical thinking, be thoughtful, persistent, creative and enjoy developing useful applications.
Algorithms
Algorithm definition
Vom porni de la un exemplu preluat din viaţa noastră.
For example, when you are doing your maths homework for the second day, you notice that you need another notebook and should go to the bookshop.
Arrange the list so that the order is logical.
Algorithm is a computer-implemented method of solving a problem.
The concept of an algorithm is not new. The term algorithm derives from the name of a Persian mathematician, Abu Ja’fat Mohammed ibn Musa al Khowarizmi, who wrote a book known by the Latin name “Liber algorithmi”.
Mathematicians of the Middle Ages understood algorithm as a rule by which arithmetical calculations were made. Later, the term algorithm circulated in a restricted sense, exclusively in the field of mathematics. With the development of computers, the word algorithm took on a special meaning, so that today algorithmic thinking has been transformed from a tool specific to mathematics into a fundamental way of approaching problems in various fields.
An algorithm is a method of solving problems of a particular type.
To solve a problem means to obtain, for some input data, the result of the problem, output data.
The algorithm consists of a sequence of operations that describe, step by step, how to obtain output data from the input data.
Algorithms can be written to solve problems in any field of activity. For example, any cooking recipe can be considered an algorithm which, starting from raw materials, produces a finite sequence of operations to obtain the finished product.
Writing algorithms
Let’s imagine that we send a robot to buy the book from the bookstore. How does the robot buy the book? It blindly executes a string of actions that are called instructions, so the robot must be taught so that it knows the algorithm.
Writing algorithms directly in a programming language (getting the program immediately) is advantageous in that we can check that the algorithm is correct by running the code. However, because the restrictions of the language must always be taken into account when writing, we can make mistakes.
Regardless of the form of writing, it is essential that an algorithm is thought out correctly, and that is not easy!
What happens if the shop is closed?
Properties of algorithms
To be able to say that a series of actions forms an algorithm, we need three fundamental conditions: finiteness, generality and clarity.
FINITUDE
The algorithm must terminate after a finite number of steps, however many. If it had an infinite number of steps, our robot could go buy bread until its battery ran out… A stop condition could be when the battery level is below 15% or, more logically, when we already have the notebook, right?
GENERALITY
The algorithm must solve a whole category of problems, not just a particular one. Returning to the bread buying algorithm made above, it can be successfully applied to other products as well:
 |  |  |
CLARITY
The algorithm must describe accurately and unambiguously the steps to be taken in solving the problem.
If we want to tell the robot to buy us a colourful t-shirt to our liking, … it has no idea! We are talking about Artificial Intelligence and Machine Learning already. It needs to know what patterns we like, what colours or stores we prefer, and so on, from previous experience, applying complex computing and analysis algorithms.
And the algorithms must be EFFICIENT. If we are in Piatra Neamt and we decide to go to Constanta, our route will certainly not include the city of Oradea, unless we take a relative from there with us. Can you imagine what fantastic algorithms are developed for Google Maps or Waze to display the optimal route in real time?
The number of steps taken by an algorithm has to be as small as possible to say it is OPTIMAL, and there is complexity theory of algorithms that deals with this.
The “black box” model
A program quantifies a computational algorithm and is designed to take some input data (such as stimuli) which it processes and provides as output data (a response):

This is called the black-box model, which abstracts the primary abstraction of any “living” element around us. The car engine revs faster if the accelerator pedal is pressed harder; if we are cold, our hair muscle contracts and we get “goose bumps”; if we press a certain icon on our phone, the associated program opens, etc.
Input data is ‘read’ using a peripheral input device such as a keyboard, mouse, joystick, touch screen, etc.
After processing, the result is “displayed” on the screen or sent to another output device: screen, printer.
Applications
1. In everyday life we encounter algorithms all the time, for example: the algorithm to make a phone call, the algorithm to add two integers, etc. Give us other examples of algorithms!
2. Read about the scientist Abu Abdullah Muhammad bin Musa al-Khwarizmi on the Internet!
3. Describe the algorithm for the day’s History lesson and for the homework.
PYTHON LANGUAGE
Installing the Python programming environment
Go to the official Python language page, Downloads section, which has the URL below:https://www.python.org/downloads//
Press the appropriate button, save the file and open it:

After the file has been launched, a panel will appear where it is recommended to check the options below to automatically add the required system variables:

Start the installation process by pressing the:![]() ( pressing the Install Now button will install Python for the current user only, and will be somewhat cumbersome).
( pressing the Install Now button will install Python for the current user only, and will be somewhat cumbersome).
Leave everything ticked in the first window:

In the second window check the Install for all users option:

Thus, the installation location will be in the location “C:\Program Files\Python38-32”, accessible to all users (in my case, version 3.8, 32-bit operating system).
Press the Install button. If everything was ok, then press Close.
The environment is successfully installed on your system, but by default you have no shortcut to Python on the Desktop, as you might expect. The operating system shown is Microsoft Windows, so press the Start button, then in the search bar type “IDLE”, then select:

IDLE stands for Integrated Development and Learning Environment.
The following window will open:

Above you have the command line, the console (Interactive Python Shell), and the current position is indicated by the three characters “>>>” and the cursor. Type “3 + 5” and press Enter,

Python will immediately display the result.
Quick access to Python
Open the folder where you installed Python (C:\Program Files\Python38-32) then the “Lib” folder and inside, “idlelib”, where you will find the location of the “idle.bat” file associated with IDLE. Create a Desktop shortcut to this program:

Vocabulary of language
The vocabulary of any programming language consists of:
· set of characters;
· identifiers;
· separators;
· comments.
Character set
The character set is the set of characters with which a Python program can be built, and is made up of:
upper and lower case letters of the English alphabet (A – Z, a – z);
digits of the base 10 numbering system (0 – 9);
special characters (+, -, *, /, =, ^, <, >, (, ), [, ], {, }, ., ,, :, ;, #, $, @, _ and blank (space)).
Unlike other programming languages, Python gives us direct character representation using the [Unicode] standard, specifically in [UTF-8] format. So, we can also enter characters that are not on the keyboard, but we can retrieve them from the Internet. That’s why we can insert special characters and even [emoji] or [smileys].
Example 1.
In Python we can also write like this, unlike other programming languages:
Greek = “αβγδεζηθικλμνξοπρςστυφχψ”
print(greek)
print(“î u h a t”)
print(“Hey! “)
Identifiers
By identifiers we mean a sequence of letters, digits or the special character “_”, provided that the first one is not a digit. Identifiers are used to associate names to variables, functions, etc.
Example 2. Look at the following variable declarations:
var1 = “mother”
var2 = “dad”
un_sir = “a family”
As counterexamples, we have “1var”, “sir&”. The first starts with a digit, and the second contains a special character.
A special category of identifiers is given by Python keywords (they have a well-defined meaning, are reserved and cannot be used in any other context). The full list is below:
False await else import pass
None break except in raise
True class finally is return
and continue for lambda try
as def from nonlocal while
assert del global not with
async elif if or yield
These must be written exactly as above to be interpreted correctly.
Python distinguishes between uppercase and lowercase letters. priNt(“Hello!”) gets a syntax error because the interpreter doesn’t know the priNt command, only the print command.
Separators
Definition. The simplest elements made up of characters with linguistic meaning are called lexical units.
These are separated from each other, as appropriate, by one or more spaces, the line-ending character or the “;” character, as already described.
Example 3. ab may mean the name of a variable, so we have one lexical unit, whereas a b contains two units…
Comments
Python encourages the insertion of comments into our code, as it is much easier to understand later. As you have seen, they can be inserted anywhere in the program, starting with the ten character (“#”) and continuing to the end of the line.
Example 4. Below is a comment written in Python:
#this is a comment
The Python language is very sensitive to syntax and is strongly oriented towards writing in a way that makes it easy to understand the code of another programmer to whom the program is written.
Writing codes
Definition 1. The syntax of the language is given by the totality of the rules of correct writing (in the sense of its acceptance by the translator program (interpreter, in the case of Python), which has the role of executing it.
Definition 2. The semantics of a language means the meaning of the correct syntactic constructions (what the instructions do, etc).
The Python language is very sensitive to syntax and is strongly oriented towards writing in a way that makes it easy to understand the code of another programmer to whom the program is written, so it is preferable to write a single instruction on each line. For example, on the same line we can’t write two instructions without separating them with “;”, and the Python interpreter lets us know immediately!
Furthermore, Python distinguishes between uppercase and lowercase letters.
Indentation is very important and we will discuss it further. For now, don’t leave blanks at the beginning of the line.
Semantically, the most difficult thing is that the program executes exactly what the maker intended, and checking for correctness is no easy task.
The Python language is interpreted, i.e. the code is executed line by line, unlike Pascal or C/C++, where you need a compiler to generate an executable file.
The console allows us to execute a Python command and get the effect immediately. The current position is indicated by the three characters “>>>” and the cursor (“|”).
Examples
EXERCISE 1
Enter the command print(“Hello, Python!”) and press the Enter key. Note the quotation marks!

It is necessary to display the result using the print() function.
EXERCISE 2
Enter the command 2+3*5-1 and press Enter.

The result will be displayed immediately after pressing the Enter key.

EXERCISE 3
Create a new program to display your name.
EXERCISE 4
The program below contains a number of errors. Your job is to correct it!

Comments
Python encourages the insertion of comments in code, as it is much easier to understand later.
They can be inserted anywhere in the program, start with the ten character (“#”) and continue to the end of the line, as you saw above.
Mathematical expressions
Programs use expressions to perform calculations.
Definition 1. An expression is a sequence of one or more operands linked by operators according to syntactic rules specific to the programming language.
For example, for the expression 3 + 4*2 , 3, 4 and 2 are operands and + and * are operators.
An incorrectly written expression will lead to an error in interpretation (this is called a syntax error):

During the execution of the Python program, expressions are evaluated (i.e. a result is calculated).
Arithmetic operators
Unary operators
Unary operators (+ and -) act on a single operand which is always to the right of the operator. The “+” returns the value of the operand and the “-” returns the value of the operand with the changed sign.
Examples: -23, +11
Binary operators
. Binary operators (+, -, *, /, // and %) act on two operands. One operand is always to the left of the operator and the other to the right of the operator.
Examples: 10+5, 5-2, 7*5, etc.
The division operator ( / )
The operator / has the meaning of division. Operands can be integer or real values, but the result will always be real.
Examples:
3/2 results in 1.5
4/2 results in 2.0
Integer division operator ( // )
The // operator (known in other languages as div) has the meaning of integer division (in English, floor division, because the result of division rounds down to an integer) – this is how you get the quotient.
Examples:
7//2, resulting in 3
14//2, resulting in 7
25//12, results in 2
The modulo operator ( % )
The % operator (known as modulo) has the meaning of the remainder of integer division.
Examples:
7%2, results in 1
14%2, results in 0
25%12, results in 1
Raising to power ( ** )
With the operator “**” you can raise a number to the power of an exponent.
Example:
2**3, yields 8
Brackets
Unlike mathematics, in Python we can only use round brackets. So instead of writing [2+3*(2+1)]*2, we write (2+3*(2+1))*2.
Exercises
Now you can practise the operators you learned earlier. First, run the following Python program:

Evaluation of expressions
It is essential to understand how to evaluate an expression, and for this we need some basics.
Priority (precedence) of operators. You are already familiar with this notion, knowing that it indicates the order in which operations are performed.
Operator associativity. The notion may be new to you, and is of two kinds: left-to-right and right-to-left. From the outset we state that operators with the same priority have the same associativity.
To understand the notion of associativity, we start from an expression in which operators are linked by operators with the same priority. If the associativity of the operators is from left to right, the first operation that is performed is the one corresponding to the first operator on the left, the second operation is the one corresponding to the second operator on the left, etc. Obviously, if the associativity is from right to left, the first operation that is performed is the one corresponding to the operator on the right, and so on.
For example, if we have the operation 7 * 2 // 4, we have left-to-right associativity, so 7*2 is performed first, then 14//4, the result is obviously 3. So here the operators have the same priority.
On the other hand, with the “**” operator, you can raise a number to the power of an exponent. In this case, associativity is from right to left. For 2 ** 3 ** 2, first 32 is performed, the result is 9. Then 29, which gets the value 512.
Notice that 2 ** 3 ** 2 is equivalent to 2 ** (3 ** 2).
If we use parentheses, the result differs, of course, because they have a higher priority than the “**” operator:
(2 ** 3) ** 2
The bracket is performed first, i.e. 23 = 8, then 82, the final result being 64.
The key is to understand how an expression evaluates, and for that we need some fundamentals.
Priority (precedence) of operators. You are already familiar with this notion, knowing that it indicates the order in which operations are performed.
Operator associativity. The notion may be new to you, and it is of two kinds: left-to-right and right-to-left. From the beginning we state that operators with the same priority have the same associativity.
To understand the notion of associativity, we start from an expression in which the operands are linked by operators with the same priority. If the associativity of the operators is from left to right, the first operation performed is the one corresponding to the first operator on the left, the second operation is the one corresponding to the second operator on the left, etc. Obviously, if the associativity is from right to left, the first operation performed is that of the operator on the right, and so on.
For example, if we have the operation 7 * 2 // 4, we have left-to-right associativity, so 7*2 is performed first, then 14//4, the result is obviously 3. So here the operators have the same precedence.
On the other hand, with the help of the “**” operator, you can raise a number to the power of an exponent. In this case, the associativity is from right to left. For 2 ** 3 ** 2, 32 is performed first, resulting in 9. Then 29, which results in 512.
Note that 2 ** 3 ** 2 is equivalent to 2 ** (3 ** 2).
If we use the parentheses, the result differs, of course, because they take precedence over the “**” operator:
(2 ** 3) ** 2
The parenthesis is performed first, i.e. 23 = 8, then 82, the final result being 64.
Variables and constants
Data can be constant (values do not change) and variable (values change)
Run the code below that reads an input date from the keyboard using the input() function, then displays it using the familiar print() function:

Exercises
Run each program below to learn more:
1.

2.

3.

Several ways of awarding
Test the following program which contains a number of assignments as well as some interesting drafting tricks:

Remark. When the print function receives multiple arguments enclosed in parentheses, separated by commas, they are displayed on the same line in order and separated by a space.
So far we have used assignment as an operator, giving a certain value to a variable. So the general form is:
v = expression
where v is the variable.
The execution principle is as follows:
– evaluate the expression;
– v is assigned the value obtained.
Multiple assignments of the form can also be performed:
v = v1 = v2 = … = vn = expression
where v, v1, v2, …, vn are variables.
Applications
1.Using the knowledge you have acquired in Physics, create a program to calculate the average speed of a mobile.
2.Using the knowledge acquired in Physics, create a program to calculate the density of a body.
3. Make a program to calculate your age.
4. Create a program to display the number of years since the birth of the poet Mihai Eminescu.
Quiz
Given the variables below, answer the following questions:
x = “ab”
y = “cd”
z = “ef”
n = 3
m = 2
1. What will the function print(x+y+z) display?
a) ab cd ef
b) abcdef
c) a b c d e f
2. What will the function print(x,z,y) display ?
a) ab cd ef
b) abefcd
c) ab ef cd
3. What will the function print(m**(1+n)) display ?
a) 9
b) 16
c) 32
4. print(1 + m*n,m,n) ?
a) 7 2 3
b) 723
c) 9 2 3
d) 9 3 2
5. print(m*n-1) ?
a) 7
b) 4
c) 5
Types of data
One of the advantages of using Python is that any variable can dynamically hold values of different types throughout a program.
Perform the following example:

The result is as follows:

What do we observe? Initially, the variable n held the numeric value 123, then a string “Python”, and finally, again a numeric value, this time real, 23.25. After each assignment we displayed what variable n holds.
Also, a first problem we identified was when we wanted to add two numbers entered from the keyboard. Implicitly, the input function takes the entered information and provides it as a string for manipulation in our code – 2 + 3 does not make 23!
In Python there are six standard main data types:
– Numeric
– Strings
– Lists
– Tuples
– Sets
– Dictionaries
Numeric data types
Numeric data types are int (signed integers), float (real numbers, with decimal places) and complex (complex numbers).
Examples:
| int() | float() | complex() |
| 11 | 0.0 | 2+3j |
| 124 | 23.14 | 1-2j |
| -93 | -173.955 | 3.14j |
When defining a variable, we can use the function named a.î. to set the type of data to be retained.
Examples:
Example 1

REMARKS – Example 1
We used the int() function which took as argument the text string entered by the user. This converted it to an integer signed value that was held by the variable x, then similar for y. This time the result is mathematically correct and that’s what we wanted – adding the numbers together.
Warning. Since we have set the data type to int() for the two variables, x and y, if we try to enter the text Star (or ‘Star’ or ‘Star’) as a value for the first variable, we will now get an error:
ValueError: invalid literal for int() with base 10: ‘Star’ on line 1
x can only hold signed integers.
Example 2

REMARKS – Example 2
A real number (float) added to an integer (int) gives a real result (float).
For 5 and 6, we get 11.0.
For 5.23 and 2, we get 7.23.
For 2.128 and 4, we get 6.128.
Note that the default result rounds to the number of decimal places of the most detailed real number. If we enter an integer, only one decimal place is used, 0, which tells us the data type – float.
Example 3

REMARKS – Example 3
Suppose we want to divide it by 10 to 3. The result is a known 3.(3) and reads 3 period 3.
The default result displayed by Python is: 3.33333333333333333
If we use the function format (value,format) as above, we can display for example the result to 20 decimal places (f comes from the fractional part) and notice that the variable rez actually holds:
Computers retain real values using many decimal places, and the value displayed may be different from the true value of a variable.
What is displayed is not always retained!
For example, we can use the function round(number[,decimal]) to round a number. The default value of the decimal parameter is 0, so the function returns the nearest integer without imposing it.
Examples:
round(12.234567,3) gets 12.234
round(12.234567,1) gets 12.2
round(12.234567) gets 12
round(6.7543,1) gets 6.8
round(6.7543) gets 7
Strings
We have already used strings, which in English are called strings. To declare a variable that holds a string, we write the text directly in quotes or apostrophes. Explicit conversion to this type is done by the str() function.
Example
The result is:

We can insert strings that are on more than one line. In this case we use three apostrophes or three quotation marks:
Examples
Test the code below in the editor:
str4 = ”’A text written
on two lines.”
str5 = ””Other written text
on two lines.””
print(str4)
print(str5)
Function type()
We can always find out the type of data held by a given variable at a given time using the type(variable) function.

The result is:

The type function in this case takes as argument the value of the variable x and returns as result the type of data retained.
Applications
1. Make a program that allows you to enter and display a question and answer about Animal World Diversity.
2. Make a program that allows you to enter and display the names of continents and the names of some countries on the continent.
Quiz
Answer all the questions below correctly:
1. What will the function print(x + ‘6’) display if x = 2 ?
a) 26
b) 8
c) error
2. What will the function print(type(x)) display if x = ’81’ ?
a) <class ‘int’>
b) <class ‘str’>
c) 81
d) ’81’
3. What type of data will x hold if x = 10 + 23/5 – 1 ?
a) int
b) float
c) str
4. If x = 11 and y = 14.25, what type will hold the variable z = x + y ?
a) float
b) int
5. Which data type holds the variable declared as: n = 100 % 9 ?
a) int
b) float
Structured programming
The theory of programming languages is vast, and one of the important concepts is structured programming.
We will learn how to program on fundamental structures.
Of particular note is the study published in 1966 by Corrado Böhm and Giuseppe Jacopini (“The Structured Programming Theorem”), followed by that of the Dutch scientist Edsger W. Dijkstra who rooted the notion of structured programming in 1968. A scientific heyday when you consider that Neil Armstrong walked on the moon the following year..

The principle is as follows:
Any algorithm that has inputs and outputs, i.e. a start and an end point, can be represented by a combination of three fundamental control structures called:
– sequence (linear structure)
– decision (alternative structure)
– cycle (repetitive structure)
Structured programming allows programs to be written in a natural language (called pseudocode), independent of practical language.
Programs are based on computational algorithms, which can be translated into logical schemes, such as the one below:
Linear structure
Linear structure, is a sequence of statements that is performed every time we run Python code, independent of the input values.
EXAMPLE
Suppose we want to make a program that reads three whole names from the keyboard and displays their arithmetic mean.
The calculation formula is simple. For a, b and c, the arithmetic mean is:
How do we think about the algorithm?
We first read the three values and hold them as integers in the three variables, a, b and c. We define a ma variable that will hold the arithmetic mean using the expression (a+b+c)/3.
Look at the logic diagram below. Suppose that the values 9, 10 and 8 have been entered: We write in the Python language

Applications
1.Modify the above algorithm a.î. to display the geometric mean of the three numbers, using the calculation formula:

2.Modify the above algorithm a.î. to display the geometric mean of four numbers.
Elementary liniar algorithms
Interchanging the values of two variables
One of the classic problems that can be encountered when creating programs is the interchanging of the values of two variables. It may seem trivial, but there are many tricks!
EXAMPLE
Suppose we have two glasses, labelled A and B, each containing 70 and 40 ml of liquid respectively:
Etape
Steps
How do we interchange their content? We can use a third handling cup, called C, which is initially empty:
Stage 1. Pour the contents of A into C:

Stage 2. We then pour the contents of B into A:
Stage 3. Finally, we pour the contents of C into B:
Glass C is empty again.
The algorithm translated into Python is therefore as follows:

Warning. Unlike glasses, where we use a mechanical process, at the end of the program variable C will hold the last value, i.e. the one now held by B.
HOW CAN WE BE WRONG?
Simple. Consider the sequence below:
A = B #A retains 40
B = A #B will hold 40 again
The first assignment loses the content of A permanently…
ANOTHER METHOD
Whoever tells you that computer science doesn’t require mathematics is dead wrong. You can perform the interchange without another handle variable! Try the code below for example:
A = A + B #A retains 110
B = A – B #B will retain 70
A = A – B #A will hold 40
Inversion of digits of a number
A classic problem asks us to invert the digits of a natural number consisting of a fixed three digits, i.e. to find its flip.
Flipping is also called inverting or mirroring.
So we start with the number 725, held by the variable n:
n = 725
Steps
1.LAST NUMBER
Again we turn to mathematics, where we already know the subtraction theorem. If we divide 725 by 10, the remainder will be 5, exactly what we want:![]()
So we can write as a first step:
c3 = n % 10
where c3 is a handle variable that will hold the last digit. The operator “%” (modulo) gives us the remainder of the division by 10.
2. PENULTIMATE DIGIT
First, we need 72, which is the quotient of 725 divided by 10
![]()
which we will use to find the remainder of the division by 10, i.e. 2:
![]()
So we define another intermediate variable, c2, which will hold the expression:
c2 = (n // 10) % 10
We read: the quotient of n divided by 10, all modulo 10.
The operator “//” represents the integer division (the quotient), already studied.
3.FIRST FIGURE
Using the operator “//” again, we immediately find the first digit:![]()
So we will write it in the programme:
c1 = n // 100
where the variable c1 will hold the first digit, i.e. 7.
We read: the quotient of n divided by 100
4. CREATING THE INVERSE
We use multiplication and addition:
![]()
because c1 holds hundreds, c2 holds tens, and c3 holds units:
inverse = c3*100 + c2*10 + c1
At the end we display the value of the inverse variable.
Writing in Python

Applications
Make a programme showing the reverse of the year in which one of the Renaissance figures was born.
Quiz
1. What will variable x retain after the following assignments?
x = 3
y = 1
x = x + x
y = x + y
x = y
a) 9
b) 8
c) 7
d) 4
2. What is displayed after executing the sequence below?
a = 3
b = 4
c = 5
a = a + b – c
b = a – b + c
c = c – a + b
print(a,b,c)
a) 3 4 5
b) 5 4 3
c) 2 3 6
d) 6 5 9
3. Evaluate the expression below:
(16/4+16%4)*5/2
a) 10
b) 10.0
c) 20
d) 12.5
4. Evaluate the expression below:
5-2*3**2
a) 81
b) -31
c) -13
d) -31.0
5. Daniela has x lei in her piggy bank. She has saved some money and asked her father to change it at the bank because she wants as many 100 lei notes as possible! Which statement gives us the quick result in Python? How many 100 lei notes can Daniela have?
a) x/100
b) x//100
c) x**100
d) x%100
6. Eric and Leo are very good friends and are passionate about literature. They often chat on WhatsApp or by phone about the world of reading… Leo reads x pages a day, and Eric reads y, 3 more than his friend. After z days, how many pages have they read together?
a) x + y*z
b) (2*x + 3)*z
c) (x + y)*z + 3
d) x*z + 3*y
Alternative structure
So far we have used the linear sequence, i.e. a series of instructions that are carried out sequentially, in the order in which they are written.
EXAMPLE
We read from the keyboard an integer number held by the variable n. Let’s display whether or not it is greater than zero.

In practice, things are more serious. Depending on the data read from the keyboard, we can execute or not execute a block of instructions!
HOW DOES IT WORK?
The computer can be programmed to make decisions, but only as we teach it!
The execution is as follows:

Step 1. Evaluate the logical_expression.
Step 2. If the logical expression is True, then execute the instruction set instruction_1. Otherwise, if the value is False, execute instruction set_2.
Above, we tested whether the value held by the variable n is greater than zero or not. Depending on the result, we displayed the corresponding information!
When we used the if statement, after typing the mandatory colon character and pressing the Enter key to enter the associated (subordinate) case statement, the new line is indented with fixed 4 characters:
which automatically indicates that inside if we can write a block consisting of several instructions, … not just one.
Relational operators
All relational operators are binary (act on two operators). These are: > (greater), >= (greater or equal), < (less), <= (less or equal), == (equal) and != (different).
Operands can be variables or values of any learned type. Here we will study how relational operators act only on integer or real variables.
The result of applying a relational operator is always a logical value – True or False.
EXAMPLE
Analyse the result of the expressions below by running the program:

Boolean values
As you can see, of particular importance are the truth values True or False. These are called Boolean values, and the concept was first defined by a 19th century mathematician called George Boole.

These values are essential in the decisions that a program must make based on values entered by the user or determined in our code. The result of a logical evaluation is held in a data type called a bool.
Of course, Python is adaptive, so explicit bool(expression) conversion is not necessary.
Logical operators
Logical operators are the following: not, and, or.
With the exception of the not operator – which is unary (acts on a single operand), the rest of the logical operators are binary (acts on two operands). Operands can be of type logical, integer, real, etc. The result will always be a value of type logical – True or False.
EXAMPLE
Analyse the result of the logical expressions below by running the program:
REMARKS
The logical negation operator (not) acts as follows: if the operand is a value other than 0 times True, the result is False; in any other case, the result is True.
The logical and operator (and). How the result is obtained can be seen from the table below:

If both operands are different from False, the result is True; otherwise it is False.
The logical operator or (or). How the result is obtained can be seen from the table below:
And here the rule is simple: if one of the operands is True, the result is True, otherwise the result is False.
Exercises
1.Read two different integers from the keyboard. Show which one is larger.
SOLUTION

After reading the two numbers (variables n and m), the if statement is executed.
First, the logical expression is evaluated. In our example it is n>m. If the number held by variable n is greater than the number held by variable m, the logical expression takes the value True and prints n is greater than m. Conversely, the logical expression takes the value False and prints m is greater than n.
Since no further instruction follows after if, execution of the program is terminated.
2.Write a program that reads a natural number (command). If it is 0, read two integers a and b and print their sum; otherwise read two real numbers x and y and print their product.
SOLUTION
Analyse and run the program below:

3.Read an integer value. If it is even (divides exactly by 2) the message “I read an even number” will be printed. Otherwise, the program will not give any message.
RESOLUTION
The program is as follows:

4.
Read 4 real values a, b, c, d. Evaluate the expression:

RESOLUTION
Numerical example: let a=1, b=2, c=3, d=4.
We have c+d=7>0, it follows that it will print a+b=1+2=3.0.
The program is as follows:

5.
Read 3 whole numbers. How many does it look like?
SOLUTION
The number of even values will be held in the handle variable p. Test each number in turn, and if it is even, add 1 to p:

6.Read an integer x. Calculate the expression::
RESOLUTION
Let’s look at the program below:

Applications
1. Write a program that checks whether a colleague/user knows the multiplication table. The student is asked what 7 x 8 is, and after their answer the computer will respond with an appropriate message.
2. Read x, a real number. Evaluate the expression:

3. Read 4 whole numbers. Decide if they are distinct (i.e. no two are equal).
Hint. Compare the first number with all the others, the second with those that follow, the third with the fourth. If none of the comparisons show equality, print the appropriate message.
4. Read 3 whole numbers. Print, if any, the number which equals the sum of the other two. Pentru x și y citite, algoritmul afișează ‘ok’:
Quiz
1.Which of the following statements is true?
a) The numbers are positive.
b) The numbers have the opposite sign.
c) The numbers read are not positive.
d) At least one is positive.
2. What is the logical condition that completes the decision operation below a.î. to check whether the value of the integer variable x is a two-digit number?
If……:
print (”Has 2 digits!”)
Else:
print(”It does not consist of 2 digits!”)
a) (x<100) and (x>10)
b) (x<=100) or (10<=x)
c) (x>9) and (x<=99)
d) No correct answer
3. What value will be displayed if 7 is read?

a) 2
b) 25
c) 12
d) 9
4. What will be displayed if x=4?

a) 5
b) 6
c) 7
d) 8
5. For the above program, what is the range to which x, a.î. must belong? to display x+3?
a) (-∞,3)
b) (-∞,3]
c) (3,5]
d) [3,5)
Operations with strings
We’ve used strings before. You assign values simply by writing the text between apostrophes, quotation marks or a combination of three by three to write multi-line text.

The data type is str.
Python has the ability to adapt, so assignments without explicitly imposing the type automatically result in str objects.
We also know that the input() function reads a user-entered string from the keyboard and returns it as type str. The read data must eventually be explicitly converted to a data type for processing, otherwise we may have errors in interpretation:

Concatenation of strings
The “+” addition operator is used to join (concatenate) two or more strings.
For two numeric values, the “*” operator represents multiplication. In the case of str operators, it is used to multiply the value (text).
Examples

The “+” operator joins strings after the operation. We can play with spaces (blank character), with multiple strings, test!
Pay attention to the data type:
Both must be of type str, otherwise you get an error. Variable n holds an int object and m holds a str object. Use the conversion str(n)+m!
Access to characters
Of course it is important to be able to access one or more characters read or held by a str variable, and the Python language gives us an easy mechanism to use.
Take a look at the example below:![]()
Consider a variable s1 that holds the string “character”.
The index of the first character is 0 and the last is 7, i.e. 8-1, where 8 is the number of characters contained in the object. Using a given index and the operators “[” and “]” together, we have access to characters:
EXAMPLE

We cannot update a certain value for a character because we will get an error from the interpreter:

însă putem actualiza întreaga valoare reținută de variabila s1 prin atribuire, precum știm.
Indice negativ. Știind lungimea șirului de caractere, putem accesa caracterele acestuia de la dreapta la stânga folosind index-urile negative. Astfel, ultimul caracter are indexul -1, penultimul, -2, ș.a.m.d.
Obviously, we get an error if we exceed the index – in this case -8, -9 does not exist!
String length
To get the length of a string, we use the len(variable_name) function.
Note again that indices start at 0 and stop at len()-1.
EXAMPLE

To get the length of a string, we use the len(variable_name) function.
Note again that indices start at 0 and stop at le
Belonging – in and not in
We can check whether a character or a substring is present in a string. Analyse the binary operators in and the not in group in the following program:
EXAMPLE

The string “Star” is found in sw, but “StarWars” is not, note the lack of space between the two words. Then it is not true that “Wars” is not a substring of the content of the str object.
As you can see, the result of the expressions is of type bool, i.e. a True or False value.
Applications
1.Make a program that reads a string of characters from the keyboard and displays whenever the letter “a” appears in the text.
2. Make a similar program that displays how many times each vowel of the English alphabet occurs in the text read and then at the end, the total of their occurrences. Note the details – the result is stylised a little below:

3.Check whether or not a read string is longer than 20.
Example. For “Eric is a smart boy in 6th grade.” True will be displayed.
4. Make a program to display information about the Enlightenment. Display the length of the text entered.
5.Create a program to calculate the volume of a body.
6. Make a program that allows you to enter the answers to 3 questions about the US Declaration of Independence.
7.Make a program to enter answers to 3 questions about transportation in the Middle Ages. After entering each answer, display one of the messages: Correct, Wrong.
8.Make a program that allows you to enter answers to 4 questions about general features of the landscape. Each answer will be marked with 4 points. Display the final score.
9. Make a program to display a message: “Isosceles triangle,” Equilateral triangle”, “Any triangle” depending on the values entered from the keyboard for the sides.
Quiz
1. For string s1, what does print(s1[2]) display?
s1 = ‘Cleopatra’
a) l
b) e
c) o
2. For the string s2, what does print(s2*3) display?
s2 = ’12’
a) 36
b) 12 12 12
c) 121212
d) s6 🙂
3. For the strings s3 and s4, what does print(s3+s4+1) display?
s3 = ’46’
s4 = ’53’
a) 100
b) 46531
c) 46 53 1
d) Error
4. What will be displayed by print(len(s5)-3), where s5 is the string below?
s5 = ‘I’m going to Greece for the summer!’
a) 19
b) 20
c) 21
d) 22
5. Let the string s6 below be. What does print(‘ ar’ not in s6) display?
s6 = ‘Mary is a doctor.’
a) True
b) False
ONLINE PRESENTATION -PREZI
Overview
Prezi is a web application through which you can make presentations perhaps even more attractive than those made in Microsoft Office PowerPoint.
Launched a few years ago, the presentation platform called Prezi appears as an original and challenging alternative to solutions in the field, offering a dynamic and creative perspective on the feeling of interactivity and how to be online in the explanatory and illustrative use of multimedia resources.
Among the many alternatives that have appeared on the market in recent years, Prezi has distinguished itself through a series of innovations, at the core of which was a fundamentally new perspective in terms of presentation. Developed by IT specialists of Zui Labs from Hungary, the program is accessible since 2009 for users from all over the world interested in finding alternatives to existing presentation programs. Although far from dethroning PowerPoint, used in the segment of multimedia presentation applications that serves a wide range of users from business to education, Prezi has established itself not so much among the average user, beneficiary of the application packages of multinational companies in the field (especially Microsoft and Apple), but in the narrower spectrum of those interested in innovative solutions.
Prezi is a non-linear means of presentation (without successive frames), based on an overall surface (a kind of virtual canvas or blackboard), on which different elements (texts, graphs, images, symbols, multimedia elements, integrated web objects) can be placed freely. The way of navigating among the elements is carried out through the different types of movement on the virtual surface: plane changes (zoom), rotation, directional movements.
The platform is based on flash technology, being accessible online (via an internet browsing program) or offline (desktop editor). The firm offers various packages from Free to Pro, including the Edu version. They differ mainly in the amount of storage space, the public/private nature of the presentations and the ways of editing online/offline. The rapid spread of Prezi is most likely due to the fact that its basic features consonate with some recent trends in the audiovisual field: the technique of plans (zoom) widely used in cinema, television, videos, computer games, interactivity, integration of multimedia content, spread of infographics, online surface, etc.
Differences between Prezi and PowerPoint

Account creation
1. Access www.prezi.com;
2. Select the For Students option;

3. Fill in the required fields with data;
4. Separate the Students & Educator and the button ;
The account is a free account and that offers us many benefits. One of the main differences between a free account and a premium one is that in the case of a free account the presentations are public.
5. Again, the role we have within the organization is selected and student is chosen;

After creating the account, there is no need to go through these steps. The www.prezi.com will be accessed and the Login button selected.
Graphical interface
After logging into your account, the Control Panel is displayed, which includes types of projects that may include movies, interacting maps, graphs, reports, posters, etc.
For more information about the types of projects that can be carried out with this application, watch the video located at the address https://prezi.com/video/.


By selecting the![]() button you can access your own pane.
button you can access your own pane.

Management and editing operations
Create a project
Stages
1.From the own panel choose the type of project and select +
2. In the window that opens you can select the templates made available by Prezi or start using a blank project type. Also, from the right side of the window you can choose: category, color palette.

3. A title is given to the project and it is established who can view the project.

Edit a project
Regardless of the type of project chosen, the application allows placing contents, symbols, other graphic and multimedia elements, grouping (framing), arranging, respectively animating them.
Operations that can be performed during a presentation:
– Setting the style – the button ![]()
– Insert items – button ![]()
Elements that can be inserted:
v File – Image, video, pdf files from your own computer
v Image – Images from your own computer or directly from the Internet
v You Tube – Video files from You Tube – by inserting directly the link to them. The advantage is that they will charge and run very fast.
v PowerPoint Slides
- Text

– Changing the order of the slides
New slides automatically appear in the presentation structure. We can change their order very simply by holding down the left click and taking them where we want.
This can be done by selecting the button ![]()

- Deleting slides
- If we want to delete a slide, click on the Edith path button. Once accessed, we place the mouse on a slide and click the red X above it.
- View presentation – button

- Presentation distribution – button


Saving the project
The completed presentations are automatically saved online and will be in the user’s account. One of the main differences between a free and a premium account is that with a free account the presentations are public. This is worth considering when entering confidential information.
View available projects
| In its own panel, all project is selected |  |
The project can be presented, distributed by sending the link. From the project panel choose the project and from the bottom right hand side select .
 |  |
Contributors can be added and assigned editing, commenting or presentation rights.
 |  |
Exercises
1. Make an interactive map that you can use in Geography classes. Work in groups of 3 students. Distribution of the project by assigning the editing right to 2 more colleagues. Share the link with your other colleagues by assigning them the right to view.
2. Make a presentation with the notions learned in the discipline geography.
