
Definition of databases
A database is an organised collection of information or structured data stored electronically on a computer. A database is usually controlled by a database management system (DBSM). Taken together, the data, DBMS and associated applications constitute a database system, abbreviated to database.
A properly designed database provides access to up-to-date and accurate information. Because proper design is essential to achieving your goals in working with a database, investing the time to learn the principles of good design makes sense. In the end, you’re more likely to end up with a database that meets your needs and can easily accommodate change.
Since their advent in the early 1960s, databases have evolved significantly. Navigational databases, such as hierarchical databases (which were based on a tree model and allowed only hierarchical interactions) and networked databases (a more flexible model allowing more complex interactions), were the initial systems for storing and managing data. Although simple, these systems were not flexible. In the 1980s, relational databases became popular, followed by object-oriented databases in the 1990s. Subsequently, as a result of the development of the internet and the need for faster processing of unstructured data, databases have evolved, with some now also operating online.
Examples of databases
– Databases for a class
– Databases for a school unit
– Database for a library
– Online school catalogue database : https://www.adservio.ro/
– Database for the subscribers of a mobile phone company
– Database for online accommodation reservation : https://www.booking.com
– Database for an online sales site
Types of activities involving the need to organise data in databases
Databases are used in all types of activities: activities of public and private institutions.
Applications
1Search for information about activities of public and private institutions where databases are used.
2.Search for information about SIIIR – Sistema Informatic Integrat al Înducaântului din România (Integrated Education Information System in Romania).
Database management systems
Database management systems (abbreviated to DBMS) are all the programs used to create, query and maintain a database.
The DBMS must ensure the transition from one level of abstraction to another, i.e. be able to interpret ‘commands’ expressed in terms of an external schema in order to translate them via the conceptual schema into input-output operations at the physical level. The DBMS manages at the conceptual level a data dictionary. The database management program modules perform physical access to the data according to the requirements expressed by a ‘command’. The data definition program modules allow the translation of a specialised language that describes the nature of the data and the logical relationship between the data at the global level according to the conceptual schema as well as the external schemas specific to each external program application. The data manipulation program modules allow users to find, insert, modify and delete data in the database using a specialised language. Data control and security program modules are designed to ensure data confidentiality and integrity, and to address concurrency issues. Utility program modules allow for the correct and easy maintenance, manipulation and operation of the database.
DBMS systems are continually evolving and need to expand in order to effectively address new user requirements.
Examples of database management systems
Microsoft Access – part of the Microsoft Office suite
FoxPro – The FoxPro programming language was invented in the mid-1980s. Created for computers using the MS-DOS operating system, it was then the language that offered the fastest access to data. In 1992, the company that owned the product, Fox Software, was bought by Microsoft.
ORACLE – Oracle is one of the world’s most popular DBMSs and is considered a professional DBMS. The system was developed by the Oracle Corporation in the USA.
Connecting to an online database

Creating a new web database
– Under available templates, click on the blank web database.
– On the right-hand side, under the blank Web database, type a name for the database file in the File name box or use the one provided for you.
– Click Create.
Access provides a number of templates with the product, and more can be downloaded from Office.com. An Access template is a pre-designed database, complete with professionally designed tables, forms, and reports. Templates give you an important start when creating a new database.
Opening an existing database
FileOpen MenuSelect the database you want to open Open
Modifying the database
Once a database has been created, it can be modified by creating new objects: tables, queries, reports, etc. Database modification operations can also be performed using the options in the Edit menu: Copy, Cut, Delete, Rename which apply to the objects contained in the database.
Saving and closing an existing database
When a new database is created, a window like the one below opens, asking you to enter the name of the database (File name section) and choose the location where the database will be saved (Save in section). The creation and, by default, the saving of the database will be done after pressing the Create button.
Closing the database
File->Close menu or click on the close window button.
Closing the Access application
File -> Exit
Folosirea funcţiei „Ajutor” (Help)
| Pentru a obține informații despre utilizarea aplicației se poate apela la Help dând clic pe butonul |  |
Proiectarea bazelor de date
Prin proiectarea unei baze de date înţelegem procesul de creare a unui proiect pentru baza de date care să asigure desfăşurarea corectă a activităţilor şi rezolvarea cerinţelor utilizatorului.
Baza de date realizată cu Microsoft Access este un fişier ce are extensia .accdb şi conţine următoarele obiecte: tabele (Tables), interogări (Query), formulare (Forms), rapoarte (Reports) şi macroinstrucţiuni (Macros).
Creea o bază de date cu Microsoft Access:
File->New->se alege din caseta din dreapta ecranului opţiunea Blank database -> se alege locaţia unde se va memora baza de date (în secţiunea Save in)->se tastează numele bazei de date în secţiunea File name a casetei care se deschide->clic pe butonul Create (sau se apasă tasta Enter).
Se deschide baza de date și se afișează un table cu cumele Table1 ce poate fi închis.
În procesul de proiectare a unei baze de date, se proiectează în primul rând tabelele.
Table
1.Creating a new table in an existing database then click Open.
2. In the Open dialog box, select and open the database.
3. On the Create tab, in the Tables group, click Table.
Creating a table based on a table template
To create a Contacts, Activities, Issues, Events or Assets table, it is recommended that you start with the table templates for these topics
Data templates have been designed to be compatible with Windows SharePoint Services 3.0 lists of the same name.
1.Click the Microsoft Office button, then click Open.
2. In the Open dialog box, select and open the database.
3.On the Create tab, in the Tables group, click Table Templates, then select one of the
available templates from the list.
 |
Insert a new table based on the selected table template.
Creating a new table by importing or linking to external data
1. To use an existing database, on the File menu, click Open.
2. In the Open dialog box, select and open the database.
3. To create a new database, on the File menu, click New.
o In the File name text box, type a file name. To change the location, click the folder icon.
o Click Create.
The new database opens, then creates and opens a new table named Table1 in the Datasheet view.
- On the External Data tab, in the Import group, click one of the available data sources.
- Follow the instructions in the dialog boxes.
Creating a table by design mode
Select Table Design ![]() and a window opens as in the figure:
and a window opens as in the figure:

As you can see, this window is divided into two horizontal sections: in the upper part you specify the name of the field (Field name column), the type – which is actually the type of data it will contain (Data Type column) and its description (Description column) – which is optional.
Data types
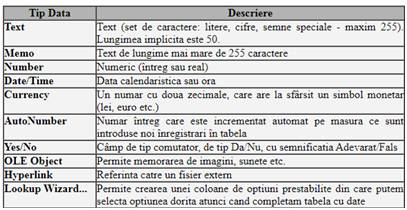
General – for each field created, depending on the data type chosen, displays certain properties of the field:
– Field size – represents the size of the area assigned to the column. By default, 50 characters are allocated for text.
– Format – represents how we can define a template.
– Input mask – entering a template to control how data is entered. For example, entering the symbol 0 or 9 requires entering a digit, L requires entering a letter, etc.
– Decimal places – specify the number of decimal places.
– Default values – the value entered in this section will be the default value of the field before editing.
– Caption – the name under which the column will appear in the forms or reports to be created. Failure to complete this section will cause the column name to be displayed.
– Validation rule – validation rule for the values entered. For example, if the table will contain a Grade field, representing the grade obtained by a student, it must be a value between 1 and 10, which will be written: >=1 and <=10.
– Validation text – this is the text that will be displayed if a value is entered that does not respect the restriction imposed by the validation rule.
– Required – specifies the acceptance or rejection of null values in a column. A null value is a 0 value for a numeric or currency type column, empty string “” for text, date vida #//# for Date/Time type, No for logical type Yes/No.
– Allow zero length – allows or disallows treating a zero length string as a valid value. Setting this property is independent of the Required property.
– Indexed – indicates the presence or absence of an index for the column. On value No(No Duplicates), the allowed values are unique, and on value Yes(Duplicates OK) the column values are not unique.
Example:

Defining the Lookup Type
Microsoft Access offers the possibility to enter data in a field from a list of values from which we choose the desired option. The elements of this list can be entered manually or automatically taken from a table field or a query. To create such a field, in which we will enter the values manually, we perform the following steps:
– select the Lookup Wizard field type;
– from the window that opens select the option “I will type in the values what I want”, then click the Next button;
– set the number of columns (usually only one column), then enter the list options and proceed to the next step (click Next)
;
– confirm the column set as search type and save the column definition (click Finish).
After each field has been defined, save the table and close it. If the save operation has not been performed before closing the table, Microsoft Access will open a box in which we have to confirm whether or not to save the created table.
Aplication
1.Design a database named School.accdb for a school unit containing general information about classes (name, principal, classroom), information about students in each class. Design 2 tables: Classes table, Pupils table2.Design a database named Class.accdb for a class of students.
Design 2 tables as follows: Table Classes
3.Design a database named Catalog.accdb for a class of students allowing the entry of grades for various subjects.
4. Design a database named Library.accdb for the school library.
Entering data in a table
To fill the table with records, double-click on the table name, which is displayed in the window containing the database objects. The records are entered taking into account the data type supported by each field.
Applications
1.Enter data in the database School.accdb for 2 classes of 15 students. tables: table Classes, table Students.
2.Enter data in the database Classroom.accdb for a class of 15 pupils
3.Enter data in the Catalog.accdb database.
4. Enter data in the Library.accdb database.
Database management
Open the table in which you want to perform operations and use the toolbar buttons:
Open the table in which you want to perform operations and use the toolbar buttons: 
Data search ![]()
Data sorting 
Applications
1. Search the database School.accdb for students with the name Popescu.
2. Sort the pupils in the database Class.accdb in alphabetical order.
3. Sort the students in the Class.accdb database by date of birth.
Form
The form is an interface between the user and the table and is used for data entry, but can also act as a menu or overview of information.
Creating simple forms
Select the table for which you want to create a form, choose from the Create tabà Forms à Form ![]() . The form containing all fields of the selected table will be displayed automatically.
. The form containing all fields of the selected table will be displayed automatically.
Creating forms using the Form Wizard (Form Expert)
Select the table for which you want to create a form, choose from the Create tab à grupul Forms à Form Wizard ![]() .
.
Steps to produce a report using Expert Form:
| Step 1 – Select the table or query for which you want to create the form; Step 2 – Select the fields we want to appear in the form; |  |
| Step 3 – Choose the layout of the form; |  |
| Step 4 – Name the form. |  |
Using forms, a user of an MS Access database can simplify the data entry process and reduce data entry errors.
Applications
1. Design a form for the Class.accdb database that allows data entry for students in the class.
2. Design a form for the Catalog.accdb database that allows the entry of grades for a specific subject for students in a class.
Simple queries
Queries are ways of selecting and displaying information from one or more sources (tables or other queries), formulated using logical conditions.
Creating a simple query (Select Query)
To define a selection query we select the Queries option in the Database window, then the Create query in design view button.
As an effect, the adjacent window will appear, from which we select consecutively (in any order) the required tables and for each one we press the Add button. After selecting the tables / queries we press the Close button.

If, once the sources to be queried have been set, we want to go back and change them, the Query menu options are available, but to remove a source we must first select it and then choose Remove:
 |  |
| If the tables have common fields (defined in the process of creating them), Access automatically sets those relationships. Next we indicate, at the bottom of the window, the fields in each table (in the desired order) to be displayed or for which selection and/or sort conditions will be specified. The fields are included by “dragging” them with the mouse from the tables in the top box to the Field row of the bottom box, or by double-clicking on their names. After this, we specify the selection conditions and/or sort order, in this way the query is considered defined. |  |
1. Design the query in Design View mode: select Query from the Database window and choose Design View design mode.
2. Include the table for which the query is executed.
3. Select Delete Query from the Query menu. As a result, the title of the window changes to Delete Query and the Delete line appears at the bottom of the window.
4. From the list of table fields displayed at the top of the window, select the fields that will be displayed in the query or for which selection conditions will be specified and “drag” them into the respective cells of the Field line at the bottom. As a result, for each field, the Where option automatically appears in those cells.
5. Enter in the cells of the Criteria line the conditions of the selection (the conditions that the records to be deleted must meet, next to the corresponding field).
6. To get the list of records to be excluded (but not yet excluded), view the query in Datasheet View mode.
7. If the results are as desired, return to Design View mode to actually remove the records by selecting the Run command from the Query menu. As a result, an information message appears on the screen about the total number of records to be deleted. If we press the Yes button, the targeted records are permanently deleted. To abort, press the No button.
Applications
1. Design a query for the School.accdb database so that students from an
in reverse alphabetical order.
2. Design a query for the School.accdb database so that the following are displayed
information: class name, principal’s name and student names
3. Design a query for the School Catalog.accdb database to display the students who
have scored above 8 in Maths.
Report
To create a new report, you will need to click on the Reports button on the left hand side of the database window and then choose the Create report by using wizard option, after which you will need to go through the necessary steps to create the desired report.
Steps to create a report using the wizard
| Step 1 – Select the table or query for which you want to report; Step 2 – Select the fields we want to appear in the report; |  |
| Step 3 – Choose how to structure the report by grouping the data in the table or query; |  |
| Step 4 – In this step you can determine how to sort the data (ascending or descending); |  |
| Step 5 – At this stage you can choose how the data will be represented in the report and the orientation of the report page (Portrait or Landscape); |  |
| Step 6 – Name the report |  |
Applications
1.Design a report for the School.accdb database so that students from an
in reverse alphabetical order.
2. Design a report for the School.accdb database so that all fields in the Students table are displayed. Set the size to A4 and the orientation to Landscape for the page.
Bibliography: